
I do love making preserves. There's something about the alchemy, and how much nicer home made jams taste than shop bought, that makes me feel all domestic goddess. It's quite simple, really (but don't let on to anyone else...) As part of my Christmas series, I am making jams and jellies this year for my nearest and dearest to go in their stockings.
If there is a secret to jam making, then I think it is this: use the right tools. My jams and chutneys have been a hundred times better since I bought a jam thermometer and use jam sugar. The thermometer was a fiver from Lakeland, so its not as though these tools cost a lot, either. Jam sugar, unlike granulated, has added pectin - the stuff that makes the jam set. You can just use granulated sugar, and its a lot cheaper, but I had a lot more failures. I say failures, the jam still tasted delicious, but it was runny and only really good for adding to ice cream. Jam sugar has so far meant that every jam or jelly I have made has set beautifully.
I save jam jars throughout the year, and get our relatives to pass theirs on too, which not only is good from an eco point of view, but also saves a substantial amount of money. Just make sure reused jars are thoroughly washed and dried before storing - the dishwasher does a great job for us. Alternatively, I have heard that Asda sell value Lemon Curd for 22p, which is cheaper than you can buy the jars for online. You can ditch the Lemon Curd (although that feels a bit wasteful to me) and just use the jar.
My other tip is to use turps to get rid of all those old sticky labels - it cuts through the old glue like nothing else, and believe me I have tried EVERYTHING. Be very careful to wash it off thoroughly though, because turps is poisonous. I rinse and wash my jars six times, using fresh water and neat Fairy liquid straight onto the glass each time to ensure that the turps has been properly washed away. You then just need to sterilise the jars and their lids by putting them onto a baking tray and putting into a low oven (gas mark 1, 140 degrees C) for about 20 mins. This kills off any bacteria hanging around that would otherwise ruin your jam.
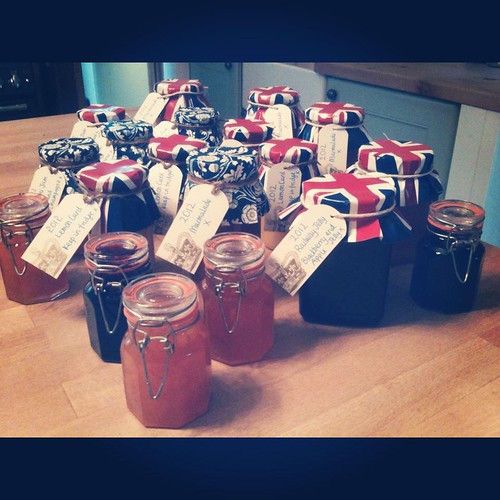
This year I used old pesto jars and teeny, tiny Kilner jars that cost £1 each from The Range - what a bargain! Not only do they look pretty, but they are fabulous for single people who may not use a big jar quickly enough - and they make your produce go further, which is a bonus when economising. The Union Jack jar labels were from Lakeland in the summer - 49p for the lot in the sale after the Jubilee! Unfortunately they've sold out now, but I do keep an eye open on their site as they have some lovely things.
I made Lemon Curd and marmalade (from this brilliant kit; it was easy and delicious, and I didn't need to remember to buy Seville oranges in January.) I also made blackberry and apple jelly, which I called "Railway Jam" as the blackberries were picked from our local disused railway line in September. Dom's Grandad, who is almost 90, drove the very last train along that line. We asked him how he knew it was the last train, and he said it was the one pulling the machine that pulled up the lines! The blackberries were delicious, and it has made lovely bittersweet, jewel coloured clear jelly. Dom got a few war wounds picking them in the first place, though, but thanks to his valiant effort, we got 4lb of free fruit! The jelly is also suitable for some of our older relatives who have false teeth and don't appreciate jam with little seeds.
I'll admit to a disaster - I tried to make the delicious sounding Apricot and Champagne conserve. I found a recipe in a lovely preserving book I have, peeled the 4lb of apricots and soaked them in sugar overnight, as instructed. However, despite following the recipe to the letter, the fruit burned on the bottom of the pan before we'd even got to the rolling boil stage. I later found out that this is quite common with apricot jam. Delia recommends buttering the bottom of her pan - I tried this and it worked beautifully second time round. The butter also meant there was no scum on the top of the jam.
They say necessity is the mother of invention and, in this case, it's true. I didn't have anymore fresh apricots and I needed to finish the jam that day. I raided the cupboard and came up with two cans of apricots, and two of peaches. I decided to risk it - and it worked beautifully. The fruit kept its shape well, and didn't need soaking overnight either. I used Asda's Smart Price peaches and apricots and, at 28p a tin, it was much cheaper too!
The end result was delicious - sweet and tangy, with golden slivers of fruit suspended in the clear jelly. I decided to call it Bellini Jam, and I am happy to share the recipe with you.
Bellini Jam
Makes 2 x 1lb jars
2 x tins of apricots (approx 225g drained weight of fruit per tin)
2 x tins of peaches (approx 225g drained weight of fruit per tin)
630g Jam sugar
Juice of one lemon
200ml dry sparkling wine or Champagne
A little butter, for greasing
1) Put a couple of saucers into the freezer
2) Wash and dry your jars, then place into an oven at gas mark 1 / 140 C for 20 mins.
3) Butter the bottom of your pan thickly.
4) Strain the fruit from the juice. Chop finely.
5) Add the chopped fruit to the pan with a couple of tablespoons of cold water, the lemon juice, the Champagne and the jam sugar. Put in the jam thermometer whilst the mixture is cold.Heat gently until the sugar has totally melted - you can see when this has happened by checking the back of your spoon - there should be no granules visible. It'll probably take about 10 mins.
6) Once the sugar has melted, turn the heat to high and bring to a rapid, rolling boil. Keep boiling until the temperature reaches 220 degrees. Around this stage test regularly to see if you have achieved a set. Get the frozen saucer out of the freezer, and drop a teaspoon full of the hot jam onto the saucer. Bring the saucer up to eye level and slowly push your finger through the jam smear. When the setting point has been reached the jam will wrinkle up.
7) Once the setting point has been reached, turn off the heat and use a slotted spoon to lift off any scum that has formed. Carefully pour the remaining jam into the hot jars using a ladle and jam funnel. Be careful, it's REALLY hot! Put the lids on tightly and leave to cool for a few minutes. Using oven gloves or a tea towel, turn each jar upside down momentarily - this will heat your lid and create a vaccum, keeping your jam fresh for longer.
Enjoy over luxurious breakfasts and lunches.
Claire x
I should add - if your fruit rises to the top of the jar then you've bottled it whilst it was too hot. I tend to find that leaving the jam for about 10 minutes off the heat once the setting point has been achieved is about right. If your fruit floats, then simply shake the jar before it cools, making sure that the lid is on tightly.
ReplyDelete